前言
elasticsearch:就是一个很快很快的搜索引擎,使用场景就是像网易词典这种,输入几个相关文字,就可以从几百万个单词中瞬间找到匹配的翻译,这种海量数据的模糊搜索在关系型数据库中是不可能的,所以这时候就要用到elasticsearch了,但是它和 MongoDB 这种文档型数据库有什么区别,有没有懂的可以在评论区教教我,我是没有搞懂
一、安装Elasticsearch 1、Windows安装
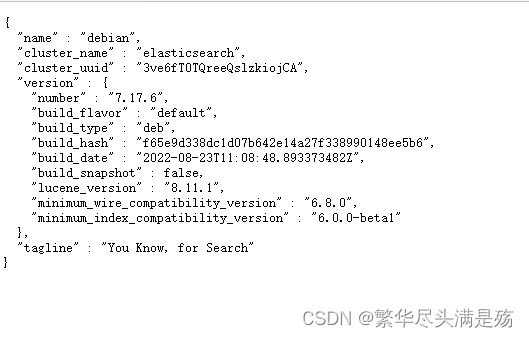
Windows安装比较简单,官网下载压缩包,解压出来,然后里面有个 bin 目录,里面有个elasticsearch.bat,双击,就运行起来了,然后在浏览器输入localhost:9200验证,成功会返回下面的图片
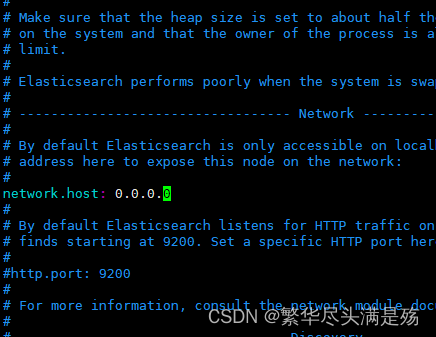
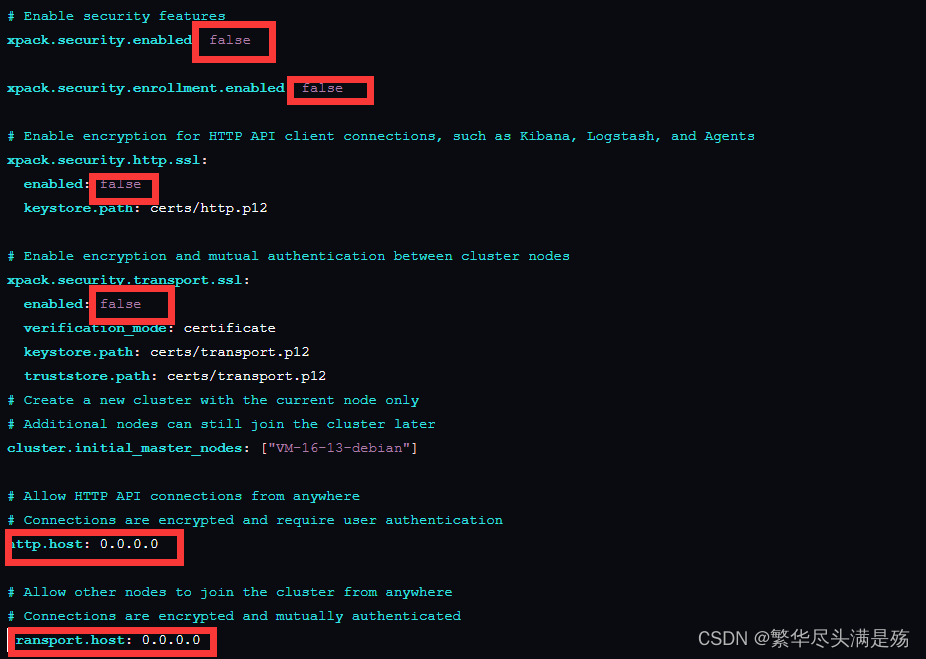
2、Linux安装 1 2 3 4 5 6 7 8 9 10 11 12 13 wget -qO - https://artifacts.elastic.co/GPG-KEY-elasticsearch | sudo gpg --dearmor -o /usr/share/keyrings/elasticsearch-keyring.gpg echo "deb [signed-by=/usr/share/keyrings/elasticsearch-keyring.gpg] https://artifacts.elastic.co/packages/8.x/apt stable main" | sudo tee /etc/apt/sources.list.d/elastic-8.x.listsudo apt update sudo apt install elasticsearch sudo vim /etc/elasticsearch/elasticsearch.yml sudo systemctl start elasticsearch.service sudo systemctl enable elasticsearch.service
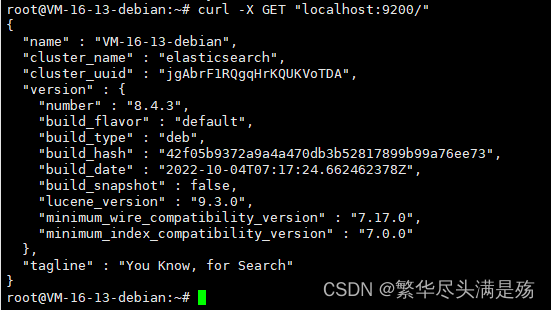
不要忘记开放防火墙端口,控制台输入curl -X GET "localhost:9200/"或浏览器访问 IP:9200
开放防火墙 9200 端口
1 2 3 4 5 6 7 8 9 ufw allow 9200 ufw reload iptables -A INPUT -p tcp --dport 9200 -j ACCEPT iptables-restore firewall-cmd --zone=public --add-port=9200/tcp --permanent firewall-cmd --reload
二、开始写代码
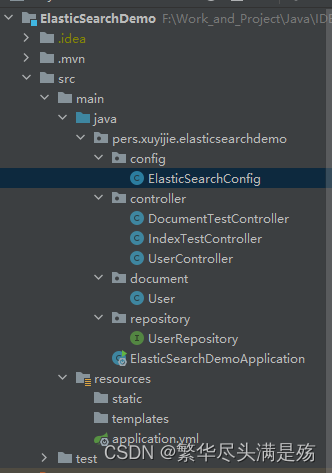
先给你们看一下项目结构
1、引入依赖 1 2 3 4 <dependency > <groupId > org.springframework.boot</groupId > <artifactId > spring-boot-starter-data-elasticsearch</artifactId > </dependency >
2、配置文件 两种方式选一种就可以了
(1) yml 方式
默认的 elasticsearch 不需要密码登录,所以不需要写
1 2 3 4 5 6 7 8 9 10 11 server: port: 8081 spring: elasticsearch: uris: 192.168 .0 .105 :9200 connection-timeout: 30000 socket-timeout: 50000 socket-keep-alive: false
(1) api 方式
新建ElasticSearchConfig,这里面的配置会覆盖掉yml里面的
1 2 3 4 5 6 7 8 9 10 11 12 13 14 15 16 17 18 19 20 21 22 23 24 25 26 27 28 29 30 package pers.xuyijie.elasticsearchdemo.config;import co.elastic.clients.elasticsearch.ElasticsearchClient;import co.elastic.clients.json.jackson.JacksonJsonpMapper;import co.elastic.clients.transport.ElasticsearchTransport;import co.elastic.clients.transport.rest_client.RestClientTransport;import org.apache.http.HttpHost;import org.elasticsearch.client.RestClient;import org.springframework.boot.SpringBootConfiguration;import org.springframework.context.annotation.Bean;@SpringBootConfiguration public class ElasticSearchConfig { @Bean public ElasticsearchClient elasticsearchClient () { RestClient client = RestClient.builder(new HttpHost ("192.168.0.105" , 9200 )) .setRequestConfigCallback(requestConfigBuilder -> requestConfigBuilder .setConnectTimeout(30000 ) .setSocketTimeout(50000 )) .build(); ElasticsearchTransport transport = new RestClientTransport (client, new JacksonJsonpMapper ()); return new ElasticsearchClient (transport); } }
3、新建 User 实体类
id这个字段一定要有,作为主键索引,这个@Document里面的indexName就相当于mysql里面的表名,在elasticsearch里面叫索引
1 2 3 4 5 6 7 8 9 10 11 12 13 14 15 16 17 18 19 20 21 22 23 24 25 package pers.xuyijie.elasticsearchdemo.document;import lombok.AllArgsConstructor;import lombok.Data;import lombok.NoArgsConstructor;import org.springframework.data.annotation.Id;import org.springframework.data.elasticsearch.annotations.Document;@Data @AllArgsConstructor @NoArgsConstructor @Document(indexName = "user") public class User { @Id private String id; private String name; private String sex; private Integer age; }
4、新建 UserRepository
这里就和 mybatis 一样了,继承一下可以使用内置方法
1 2 3 4 5 6 7 8 9 10 11 12 13 14 15 16 17 18 19 package pers.xuyijie.elasticsearchdemo.repository;import org.springframework.data.domain.Page;import org.springframework.data.domain.Pageable;import org.springframework.data.elasticsearch.annotations.Query;import org.springframework.data.elasticsearch.repository.ElasticsearchRepository;import pers.xuyijie.elasticsearchdemo.document.User;import java.util.List;public interface UserRepository extends ElasticsearchRepository <User, String> {}
5、新建 Controller
下面我把这3个controller的代码放出来,方法很简单,都是增删改查,都有写注释,等下测试用
DocumentTestController.java
1 2 3 4 5 6 7 8 9 10 11 12 13 14 15 16 17 18 19 20 21 22 23 24 25 26 27 28 29 30 31 32 33 34 35 36 37 38 39 40 41 42 43 44 45 46 47 48 49 50 51 52 53 54 55 56 57 58 59 60 61 62 63 64 65 66 67 68 69 70 71 72 73 74 75 76 77 78 79 80 81 82 83 84 85 86 87 88 89 90 91 92 93 94 95 96 97 98 99 100 101 102 103 104 105 106 107 108 109 110 111 112 113 114 115 116 117 118 119 120 package pers.xuyijie.elasticsearchdemo.controller;import co.elastic.clients.elasticsearch.ElasticsearchClient;import co.elastic.clients.elasticsearch._types.SortOrder;import co.elastic.clients.elasticsearch.core.*;import co.elastic.clients.elasticsearch.core.bulk.BulkOperation;import co.elastic.clients.elasticsearch.core.search.Hit;import co.elastic.clients.transport.endpoints.BooleanResponse;import org.springframework.web.bind.annotation.RequestMapping;import org.springframework.web.bind.annotation.RestController;import pers.xuyijie.elasticsearchdemo.document.User;import java.io.IOException;import java.util.ArrayList;import java.util.List;@RestController @RequestMapping("/documentTest") public class DocumentTestController { private final ElasticsearchClient elasticsearchClient; public DocumentTestController (ElasticsearchClient elasticsearchClient) { this .elasticsearchClient = elasticsearchClient; } @RequestMapping("/insert") public void insert () throws IOException { User user = new User ("1" , "user1" , "男" , 18 ); IndexResponse indexResponse = elasticsearchClient.index(i -> i .index("user" ) .id("1" ) .document(user)); System.out.println(indexResponse); } @RequestMapping("/update") public void update () throws IOException { UpdateResponse<User> updateResponse = elasticsearchClient.update(u -> u .index("user" ) .id("1" ) .doc(new User ("1" , "user2" , "男" , 19 )) , User.class); System.out.println(updateResponse); } @RequestMapping("/isExists") public void isExists () throws IOException { BooleanResponse indexResponse = elasticsearchClient.exists(e -> e.index("user" ).id("1" )); System.out.println(indexResponse.value()); } @RequestMapping("/get") public void get () throws IOException { GetResponse<User> getResponse = elasticsearchClient.get(g -> g .index("user" ) .id("1" ) , User.class ); System.out.println(getResponse.source()); } @RequestMapping("/delete") public void delete () throws IOException { DeleteResponse deleteResponse = elasticsearchClient.delete(d -> d .index("user" ) .id("1" ) ); System.out.println(deleteResponse.id()); } @RequestMapping("/insertMultiple") public void insertMultiple () throws IOException { List<User> userList = new ArrayList <>(); userList.add(new User ("10" , "user1" , "男" , 18 )); userList.add(new User ("11" , "user2" , "男" ,19 )); userList.add(new User ("12" , "user3" , "女" ,20 )); userList.add(new User ("13" , "user4" , "女" ,21 )); userList.add(new User ("14" , "user5" , "女" ,22 )); List<BulkOperation> bulkOperationArrayList = new ArrayList <>(); for (User user : userList){ bulkOperationArrayList.add(BulkOperation.of(o->o.index(i->i.document(user)))); } BulkResponse bulkResponse = elasticsearchClient.bulk(b -> b.index("user" ) .operations(bulkOperationArrayList)); System.out.println(bulkResponse); } @RequestMapping("/getComplex") public void getComplex () throws IOException { SearchResponse<User> search = elasticsearchClient.search(s -> s .index("user" ) .query(q -> q .term(t -> t .field("name" ) .value(v -> v.stringValue("hello" )) )) .from(0 ) .size(3 ) .sort(f->f.field(o->o.field("age" ).order(SortOrder.Desc))),User.class ); for (Hit<User> hit : search.hits().hits()) { System.out.println(hit.source()); } } }
IndexTestController.java
1 2 3 4 5 6 7 8 9 10 11 12 13 14 15 16 17 18 19 20 21 22 23 24 25 26 27 28 29 30 31 32 33 34 35 36 37 38 39 40 41 42 43 44 45 46 47 48 49 50 51 52 53 54 package pers.xuyijie.elasticsearchdemo.controller;import co.elastic.clients.elasticsearch.ElasticsearchClient;import co.elastic.clients.elasticsearch.indices.CreateIndexResponse;import co.elastic.clients.elasticsearch.indices.DeleteIndexResponse;import co.elastic.clients.elasticsearch.indices.GetIndexResponse;import co.elastic.clients.transport.endpoints.BooleanResponse;import org.springframework.web.bind.annotation.GetMapping;import org.springframework.web.bind.annotation.RequestMapping;import org.springframework.web.bind.annotation.RestController;import java.io.IOException;@RestController @RequestMapping("/indexTest") public class IndexTestController { private final ElasticsearchClient elasticsearchClient; public IndexTestController (ElasticsearchClient elasticsearchClient) { this .elasticsearchClient = elasticsearchClient; } @GetMapping("/insert") public void insert () throws IOException { CreateIndexResponse createIndexResponse = elasticsearchClient.indices().create(c -> c.index("user" )); System.out.println(createIndexResponse); } @GetMapping("/get") public void get () throws IOException { GetIndexResponse getIndexResponse = elasticsearchClient.indices().get(c -> c.index("user" )); System.out.println(getIndexResponse); } @GetMapping("/delete") public void delete () throws IOException { DeleteIndexResponse deleteIndexResponse = elasticsearchClient.indices().delete(c -> c.index("user" )); System.out.println(deleteIndexResponse.acknowledged()); } @GetMapping("/isExists") public void isExists () throws IOException { BooleanResponse booleanResponse = elasticsearchClient.indices().exists(c -> c.index("user" )); System.out.println(booleanResponse.value()); } }
UserController.java
1 2 3 4 5 6 7 8 9 10 11 12 13 14 15 16 17 18 19 20 21 22 23 24 25 26 27 28 29 30 31 32 33 34 35 36 37 38 39 40 41 42 43 44 45 46 47 48 49 50 51 52 53 54 55 56 57 58 59 60 61 62 63 64 65 66 67 68 69 70 71 72 73 74 75 76 package pers.xuyijie.elasticsearchdemo.controller;import org.springframework.web.bind.annotation.RequestMapping;import org.springframework.web.bind.annotation.RestController;import pers.xuyijie.elasticsearchdemo.document.User;import pers.xuyijie.elasticsearchdemo.repository.UserRepository;@RestController @RequestMapping("/user") public class UserController { private final UserRepository userRepository; public UserController (UserRepository userRepository) { this .userRepository = userRepository; } @RequestMapping("/insert") public String insert () { User user = new User (); user.setId("1" ); user.setName("徐一杰" ); user.setSex("男" ); user.setAge(22 ); userRepository.save(user); return "success" ; } @RequestMapping("/delete") public String delete () { User user = userRepository.getUserById("1" ); userRepository.delete(user); return "success" ; } @RequestMapping("/update") public String update () { User user = userRepository.getUserById("1" ); user.setName("泡泡" ); userRepository.save(user); return "success" ; } @RequestMapping("/get") public User get () { User user = userRepository.getUserById("1" ); System.out.println(user); return user; } @RequestMapping("/findByQuery") public Page<User> findByQuery () { Pageable pageable = PageRequest.of(1 ,20 , Sort.by(new Sort .Order(Sort.Direction.ASC, "age" ))); Page<User> userList = userRepository.findByName("1" , pageable); System.out.println(userList); return userList; } }
6、开始测试 (1) 启动项目
可以看到,我们的user索引自动添加到elasticsearch里面了
(2) 查询索引
我们调用 http://127.0.0.1:8081/indexTest/get,可以看到,控制台打印出 user 的信息
IndexTestController里面的方法都是操作索引的,删除、新增等
(3) 新增数据
我们先调用http://127.0.0.1:8081/documentTest/insert,往user里面添加一条数据,这是DocumentTestController里面的方法,这个controller里面的方法可以操作没有继承 ElasticsearchRepository 的实体类
下面我们查询出来我们刚刚插入的数据,这次我们调用 repository里面的内置方法,http://127.0.0.1:8081/user/get,查询成功
7、复杂查询条件
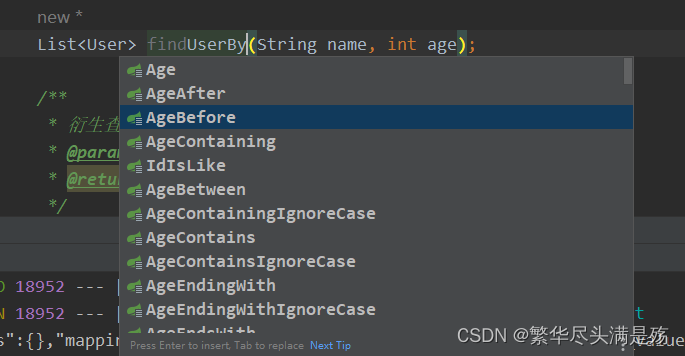
对于多条件查询,我们可以使用ElasticsearchRepository自带的衍生查询,关键词 find by 等等,有代码提示
1 2 3 4 5 6 7 8 9 10 11 12 13 14 15 16 17 18 19 20 21 22 23 24 25 26 27 28 29 30 31 32 33 34 35 36 37 38 39 40 41 42 43 44 45 package pers.xuyijie.elasticsearchdemo.repository;import org.springframework.data.domain.Page;import org.springframework.data.domain.Pageable;import org.springframework.data.elasticsearch.annotations.Query;import org.springframework.data.elasticsearch.repository.ElasticsearchRepository;import pers.xuyijie.elasticsearchdemo.document.User;import java.util.List;public interface UserRepository extends ElasticsearchRepository <User, String> { List<User> findUsersByNameAndAgeBeforeOrderByAgeAsc (String name, int age) ; User getUserById (String id) ; @Query("'{\"bool\" : {\"must\" : {\"field\" : {\"name\" : \"?0\"}}}}'") Page<User> findByName (String name, Pageable pageable) ; }
然后还有在DocumentTestController 里面的getComplex方法,也可以和构建复杂条件
1
2
3
4
5
6
7
8
9
10
11
12
13
14
15
16
17
18
19
20
21
@RequestMapping("/getComplex") public void getComplex () throws IOException { SearchResponse<User> search = elasticsearchClient.search(s -> s .index("user" ) .query(q -> q .term(t -> t .field("name" ) .value(v -> v.stringValue("hello" )) )) .from(0 ) .size(3 ) .sort(f->f.field(o->o.field("age" ).order(SortOrder.Desc))),User.class ); for (Hit<User> hit : search.hits().hits()) { System.out.println(hit.source()); } }
总结 