前言 As we all know,现今主流权限框架有 SpringSecurity、Shiro、SaToken,Shiro在前后端分离时代基本被淘汰,剩下适合大型项目的 SpringSecurity 和 适合中小型项目的 SaToken 可以选择,SaToken 我也写了文章 Springboot 使用 SaToken 进行登录认证、权限管理以及路由规则接口拦截
SpringSecurity 作为 Spring 的官方权限框架,肯定是最牛逼的,当然也最复杂,中小型项目还是 SaToken 来的省心呀,简单,几行代码实现认证、拦截、踢人、单点登录等,SpringSecurity 想要实现这些功能,需要深入研究,现在我只写最简单的用户认证和接口权限控制。
现在的 SpringSecurity 版本更换了新的配置方式,下面有写
一、引入依赖
自己新建一个标准的 Springboot web 项目,然后增加下面这个依赖
1 2 3 4 <dependency > <groupId > org.springframework.boot</groupId > <artifactId > spring-boot-starter-security</artifactId > </dependency >
二、启动类增加注解
@EnableWebSecurity表示启用户 springsecurity 功能@EnableGlobalMethodSecurity(prePostEnabled = true)是开启基于注解的接口权限控制
1 2 3 4 5 6 7 8 9 10 11 12 13 14 15 @SpringBootApplication @EnableWebSecurity @EnableGlobalMethodSecurity(prePostEnabled = true) public class SpringSecurityDemoApplication { public static void main (String[] args) { SpringApplication.run(SpringSecurityDemoApplication.class, args); } }
三、config配置文件 现在的 SpringSecurity 版本更换了新的配置方式,目前新版本仍兼容旧版配置,你不喜欢新版配置也可以用旧版
旧版配置 1 2 3 4 5 6 7 8 9 10 11 12 13 14 15 16 17 18 19 20 21 22 23 24 25 26 27 28 29 30 31 32 33 34 35 36 37 38 39 40 41 42 43 44 45 46 47 48 49 50 51 52 53 54 55 56 57 58 59 60 61 62 63 64 import org.springframework.boot.SpringBootConfiguration;import org.springframework.context.annotation.Bean;import org.springframework.http.HttpMethod;import org.springframework.security.config.annotation.authentication.builders.AuthenticationManagerBuilder;import org.springframework.security.config.annotation.web.builders.HttpSecurity;import org.springframework.security.config.annotation.web.builders.WebSecurity;import org.springframework.security.config.annotation.web.configuration.WebSecurityConfigurerAdapter;import org.springframework.security.crypto.bcrypt.BCryptPasswordEncoder;import org.springframework.security.crypto.password.PasswordEncoder;@SpringBootConfiguration public class WebSecurityConfig extends WebSecurityConfigurerAdapter { @Bean public PasswordEncoder passwordEncoder () { return new BCryptPasswordEncoder (); } public void configure (WebSecurity web) throws Exception { web.ignoring().antMatchers("/resources/**" , "/ignore2" ); } @Override protected void configure (HttpSecurity httpSecurity) throws Exception { httpSecurity.authorizeRequests() .antMatchers(HttpMethod.GET, "/test/any" ).permitAll() .antMatchers("/test/admin" ).hasRole("admin" ) .anyRequest().authenticated() .and() .formLogin() .loginProcessingUrl("/login" ) .and() .csrf().disable(); } }
新版配置 1 2 3 4 5 6 7 8 9 10 11 12 13 14 15 16 17 18 19 20 21 22 23 24 25 26 27 28 29 30 31 32 33 34 35 36 37 38 39 40 41 42 43 44 45 46 47 48 49 50 51 52 53 54 55 56 57 58 59 60 61 62 63 64 65 66 67 68 package icu.xuyijie.springsecuritydemo.config;import org.springframework.boot.SpringBootConfiguration;import org.springframework.context.annotation.Bean;import org.springframework.http.HttpMethod;import org.springframework.security.config.annotation.web.builders.HttpSecurity;import org.springframework.security.config.annotation.web.configuration.WebSecurityCustomizer;import org.springframework.security.crypto.bcrypt.BCryptPasswordEncoder;import org.springframework.security.crypto.password.PasswordEncoder;import org.springframework.security.web.SecurityFilterChain;@SpringBootConfiguration public class WebSecurityNewConfig { @Bean public PasswordEncoder passwordEncoder () { return new BCryptPasswordEncoder (); } @Bean public WebSecurityCustomizer webSecurityCustomizer () { return (web) -> web.ignoring().antMatchers("/resources/**" , "/ignore2" ); } @Bean public SecurityFilterChain securityFilterChain (HttpSecurity httpSecurity) throws Exception { httpSecurity.authorizeRequests() .antMatchers(HttpMethod.GET, "/test/any" , "/js/**" , "/css/**" , "/images/**" , "/icon/**" , "/file/**" ).permitAll() .antMatchers("/test/admin" ).hasRole("admin" ) .anyRequest().authenticated() .and() .formLogin() .loginProcessingUrl("/login" ) .and() .csrf().disable(); return httpSecurity.build(); } }
四、UserDetailsServiceImpl
UserDetailsService 是 SpringSecurity 的内置类,我们需要实现它的 loadUserByUsername 方法,方法参数 username 就是登录时填写的用户名,里面写从数据库获取这个 username 的密码和角色,然后 return 给 SpringSecurity 内置的 User 实体类
1
2
3
4
5
6
7
8
9
10
11
12
13
14
15
16
17
18
19
20
21
22
23
24
25
26
27
28
29
30
31
32
33
34
35
36
37
38
39
40
41
42
43
44
45
46
import org.springframework.beans.factory.annotation.Autowired;import org.springframework.security.core.GrantedAuthority;import org.springframework.security.core.authority.SimpleGrantedAuthority;import org.springframework.security.core.userdetails.User;import org.springframework.security.core.userdetails.UserDetails;import org.springframework.security.core.userdetails.UserDetailsService;import org.springframework.security.core.userdetails.UsernameNotFoundException;import org.springframework.security.crypto.password.PasswordEncoder;import org.springframework.stereotype.Service;import java.util.ArrayList;import java.util.List;@Service public class UserDetailsServiceImpl implements UserDetailsService { @Autowired private final PasswordEncoder passwordEncoder; @Override public UserDetails loadUserByUsername (String username) throws UsernameNotFoundException { String role = "user" ; String password = "123456" ; List<GrantedAuthority> authorityList = new ArrayList <>(); authorityList.add(new SimpleGrantedAuthority ("ROLE_" + role)); return new User ( username, passwordEncoder.encode(password), authorityList ); } }
五、写一个Controller测试用
上面主启动类添加的注解开启基于注解的接口权限的意思就是开启下面的 @PreAuthorize注解的功能,config 里面配置的 .antMatchers("/test/admin").hasRole("admin") 一个意思,选其中一个方式即可。
1
2
3
4
5
6
7
8
9
10
11
12
13
14
15
16
17
18
19
20
21
22
23
24
25
26
27
28
29
30
31
32
33
34
35
36
37
38
39
40
41
42
43
import org.springframework.security.access.prepost.PreAuthorize;import org.springframework.web.bind.annotation.RequestMapping;import org.springframework.web.bind.annotation.RestController;@RestController @RequestMapping("/test") public class TestController { @PreAuthorize("hasAnyRole('user', 'admin')") @RequestMapping("/user") public String user () { System.out.println("user和admin角色访问" ); return "user和admin角色访问" ; } @PreAuthorize("hasAnyRole('admin')") @RequestMapping("/admin") public String admin () { System.out.println("admin角色访问" ); return "admin角色访问" ; } @RequestMapping("/any") public String any () { System.out.println("这个接口Get请求无需登录" ); return "这个接口Get请求无需登录" ; } }
六、启动测试
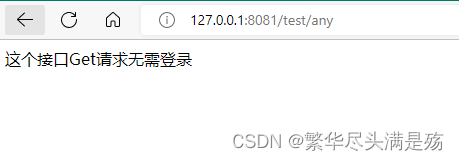
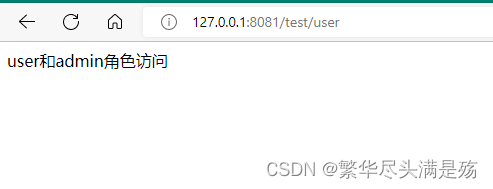
我们先访问 http://127.0.0.1:8081/test/any,这时我们还没有登录,这个接口我们在config 里面配置了.permitAll(),所以没有被拦截,直接访问成功
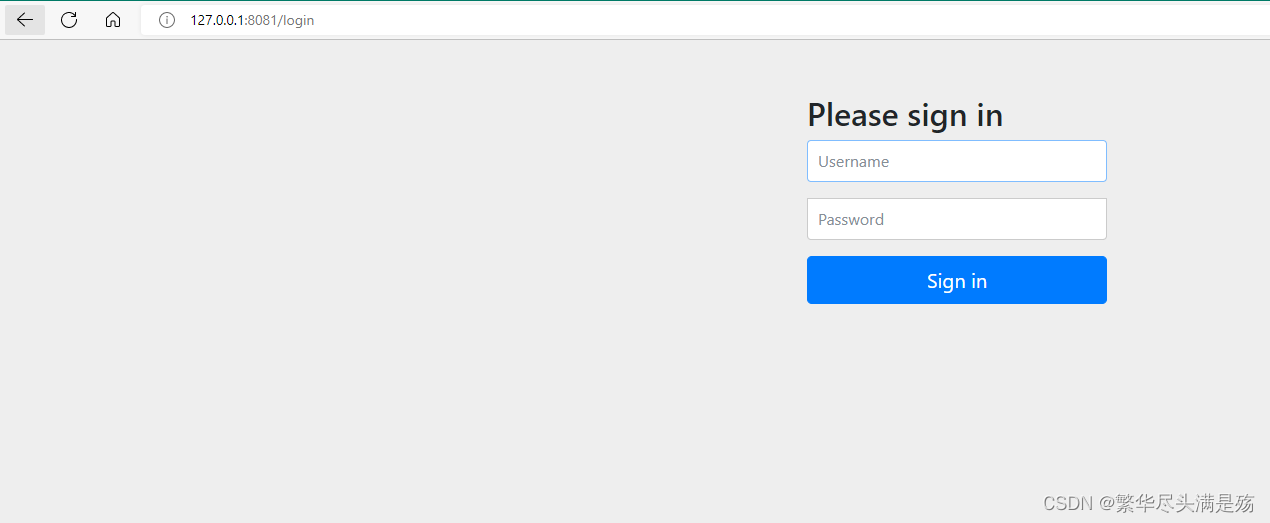
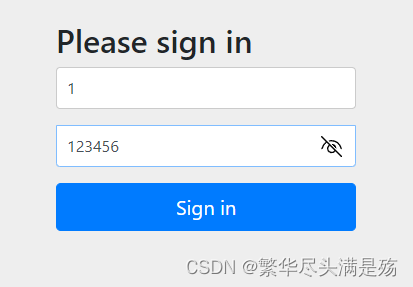
下面我门访问 http://127.0.0.1:8081/test/user,发现浏览器自动跳转到了登录界面,这个登录界面是SpringSecurity内置的,如需使用自定义页面,下面会讲
输入账号密码点击 Sign in,发现浏览器自动跳回http://127.0.0.1:8081/test/user,访问成功UserDetailsServiceImpl中我们没有指定用户名,所以 123456 这个密码所有用户都能用
如果访问 /test/admin 这个接口,报错 403,代表无权限
七、前后端分离设计 1、自定义登录界面
config里面配置的 .loginProcessingUrl("/login")是默认使用SpringSecurity内置登录页面,如果需要使用前端登陆页面,可以配置一个 MvnConfig 拦截接口,让前端跳转到他们的登录页面,然后把登录请求发送给/login这个内置接口就行了
当然也可以单独写一个登录页面放到后端的 resources/static里面,这样可以直接在 config的loginProcessingUrl中修改
2、自定义登录成功/失败处理器
自定义处理器,这里写你登录失败的逻辑,返回给前端数据,让前端进行页面跳转
1
2
3
4
5
6
7
8
9
10
11
12
13
14
15
16
17
18
19
20
21
22
23
24
25
import org.springframework.security.core.AuthenticationException;import org.springframework.security.web.authentication.SimpleUrlAuthenticationFailureHandler;import org.springframework.stereotype.Component;import javax.servlet.ServletException;import javax.servlet.http.HttpServletRequest;import javax.servlet.http.HttpServletResponse;import java.io.IOException;@Component public class LoginFailureHandler extends SimpleUrlAuthenticationFailureHandler { @Override public void onAuthenticationFailure (HttpServletRequest request, HttpServletResponse response, AuthenticationException exception) throws IOException, ServletException { response.setContentType("application/json;charset=UTF-8" ); System.out.println("登录成功" ); } }
在config的securityFilterChain方法里面添加下面代码,loginSuccessHandler代码和上面一样
1 2 3 .successHandler(loginSuccessHandler) .failureHandler(loginFailureHandler)
总结
SpringSecurity 作为 Spring 的官方权限框架,肯定是最牛逼的,当然也最复杂,中小型项目还是 SaToken 来的省心呀,简单,几行代码实现认证、拦截、踢人、单点登录等,SpringSecurity 想要实现这些功能,SaToken 我也写了文章 Springboot 使用 SaToken 进行登录认证、权限管理以及路由规则接口拦截


 wechat
 alipay