前言

为什么要配置物理地址映射:因为前端的 <img :src="">或者 :style="background-img(url)"这些,如果要给这些标签动态赋值,从后端传来的路径必须是 url 形式,也就是说带冒号的动态src或者url不支持绝对路径的物理地址。 所以要配置物理地址映射把图片的的物理地址映射为 url 地址传给前端。比如 ==D:/aa.png== 前端 ==:src== 无法识别,映射为 ==http://localhost/aa.png== 就可以识别了。

为什么要配置静态资源代理:理由和上面一样,只是这个配置是项目部署到服务器上必须要添加的。也就是说项目在本地跑,上传和访问本地的图片,只需要配置Springboot的物理地址映射就可以了。

本篇文章没有介绍如何从前端上传图片并使用后端处理后讲 base64 转化为 url 存入数据库,我的另一篇有详细讲。传送门:Vue+Springboot上传图片将 Base64 码转换为图片保存在指定文件夹


一、Nginx 静态资源代理配置

先放这个,因为简单,下面配置了两个目录的代理,也就是

==http://你的IP:端口号/user_head/aa.png==可以访问到 ==/www/wwwroot/xuyijie.icu/upload_file/user_head/== 里面的aa.png

==http://你的IP:端口号/blog_img/aa.png==可以访问到 ==/www/wwwroot/xuyijie.icu/upload_file/blog_img/== 里面的aa.png

注意!如果你的服务器配置了类似下面的接口反向代理,你的访问 url 要加上 api 哦,也就是下面这样

http://你的IP:端口号/api/user_head/aa.png

1
2
3
location /api/ {
proxy_pass http://127.0.0.1:8082/;
}
1
2
3
4
5
6
7
8
9
10
11
12
13
# 下面两个location的意思是访问 http://你的IP:端口号/user_head/aa.png 就可以访问到在 
/www/wwwroot/xuyijie.icu/upload_file/user_head/ 目录下的aa图片了

#然后你就可以把http://你的IP:端口号/user_head/aa.png写到你的前端的 scr 里面就可以访问到了

location /user_head/ {
root /www/wwwroot/xuyijie.icu/upload_file/;
autoindex on;
}
location /blog_img/ {
root /www/wwwroot/xuyijie.icu/upload_file/;
autoindex on;
}

二、Springboot 物理地址映射配置

新建 config 包,在里面新建 WebConfig 类
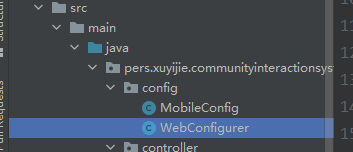
在这里插入图片描述
代码如下,解析都在注释里

1
2
3
4
5
6
7
8
9
10
11
12
13
14
15
16
17
18
19
20
21
22
23
24
25
26
package pers.xuyijie.communityinteractionsystem.config;

import org.springframework.beans.factory.annotation.Value;
import org.springframework.boot.SpringBootConfiguration;
import org.springframework.web.servlet.config.annotation.ResourceHandlerRegistry;
import org.springframework.web.servlet.config.annotation.WebMvcConfigurer;
@SpringBootConfiguration
public class WebConfigurer implements WebMvcConfigurer {
//映射到本地路径的代码意思是
// 在F:/uploadFiles/user_head/目录下如果有一张aa.png的图片,那么
// 访问:http://localhost:8081/user_head/aa.png就可以访问到它
// 静态html 中这样写 <img src="http://localhost:8081/user_head/aa.png">
// 动态html 中这样写 <img :src="imgUrl"> 把值赋给imgUrl就行,(this.imgUrl="http://localhost:8081/user_head/aa.png")

@Override
public void addResourceHandlers(ResourceHandlerRegistry registry) {
//映射到本地路径
registry.addResourceHandler("/user_head/**").addResourceLocations("file:F:/uploadFiles/user_head/");
registry.addResourceHandler("/blog_img/**").addResourceLocations("file:F:/uploadFiles/blog_img/");

//映射到服务器的保存路径也可以(和上面的本地路径只能二选一,两个路径不能同时生效)
//不推荐用代码映射服务器地址,因为我们已经用 Nginx 来代理服务器地址了)
registry.addResourceHandler("/user_head/**").addResourceLocations("file:/www/wwwroot/xuyijie.icu/upload_file/user_head/");
registry.addResourceHandler("/blog_img/**").addResourceLocations("file:/www/wwwroot/xuyijie.icu/upload_file/blog_img/")
}
}

其实“addResourceLocations”里的路径指图片的真是存储路径,和数据库里存储的图片物理路径的字段的值无关
“数据库”里的路径瞎写都可以,只要对应图片的地址就可以,比如图片存在服务器的/www/wwwroot/xuyijie.icu/upload_file/user_head/目录,
“addResourceLocations”里和数据库里都写F://,这样也可以访问到,addResourceLocations是解析路径前端的:src路径,使图片的物理路径转换为url


总结

这是一个总结

哦对了,如果前后端不会打包部署到服务器,我的另外一篇文章有详细讲解,

传送门:记Linux使用宝塔部署Vue+Springboot前后端分离项目